
Looking to insert or remove a microSD card on your Nintendo Switch, but aren’t entirely sure how? Luckily, we’re here to help.
There’s nothing more irritating than finding out you don’t have enough storage space to download a new game. The good news is, Nintendo has made it very easy to expand the storage on your Switch, thanks to a microSD card slot. So there’s no reason to ever miss out on a great Nintendo Switch game because you don’t have enough space for it. You can increase the capacity on your device from 32GB all the way up to 1TB thanks to a microSD card. After you have chosen the best memory card for the Nintendo Switch, you will need to insert into your Switch to benefit from the extra space.
Wondering how to safely install it into your gaming console? Not to worry. In this article, we will guide you through step-by-step instructions on how to correctly insert and remove a microSD card on your Nintendo Switch.
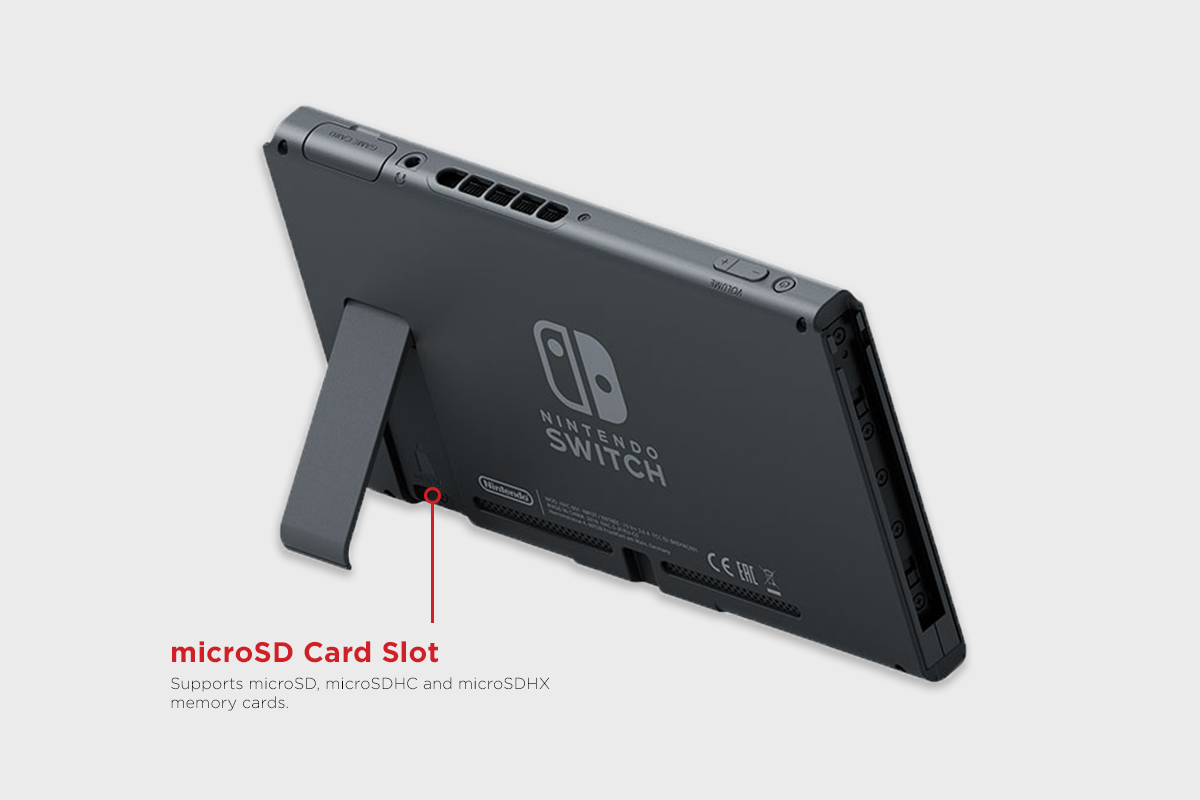
microSD Card Slot on Nintendo Switch | Photo: Nintendo/MyMemory
How do I insert a microSD card into the Nintendo Switch?
Inserting a microSD card into your console can be a bit fiddly, however, with the right steps you will be able to quickly and easily expand the storage capacity of your device. Unsure how to do so? To find out how to insert a microSD card on a Nintendo Switch, follow the steps below:
Step 1: Firstly, turn off the power on your Nintendo Switch console by holding down the button for 5 seconds.
Step 2: If you haven’t already done so, remove the Nintendo Switch from the dock and turn it over, so it is face down.
Step 3: After you have done this, gently swing the stand open to show the microSD card slot found on the back of the device.
Step 4: Make sure the microSD card is properly positioned and facing the correct way. If the label/logo is facing away from the console then this is correct.
Step 5: Insert the microSD card into the card slot and gently push down until it clicks into place. Turn the console on via the power button.
The extra storage space will be available right away if you have inserted a blank microSD card into your Switch. To verify this, select the Gear Icon (System Settings), then Data Management. The available storage space left on your memory card will be displayed in the top right-hand corner.
- Installed a microSD card with data already stored on it? If so, you will be required to format the card. To do so, select Format and follow the instructions from here. It’s important to note that you will lose any data you have stored on the microSD card after formatting so make sure you have backed everything up if you are wanting to keep it.
- If you are using a microSDXC card on the Switch, you must perform a system update before downloading games onto the card. Select System Update in the pop-up and follow the instructions from here.
How do I remove a microSD card from the Nintendo Switch?
Whether you are wanting to upgrade your microSD card to a bigger capacity or you need the card to be able to transfer data, you may find yourself needing to remove the microSD card. Wondering how to do this? Follow the steps below to safely remove a microSD card from your Nintendo Switch:
Step 1: To begin, turn off the power on your Nintendo Switch console by holding down the button for 5 seconds.
Step 2: After you have done this, gently swing the stand open to show the microSD card slot found on the back of the device.
Step 3: Gently push down on the top of the microSD card until you hear a click, from here, you can slide it out of the microSD card slot.
What happens if I run out of space on my microSD card?
Even with a microSD card installed, you may find that your games and screenshots are taking up more space than you first predicted. If this happens, you have a few things you can do to help solve this issue:
- Transfer your data from one microSD card to another card by using a computer.
- Uninstall games that you have completed or think you won’t play anymore to free up space.
- Use different microSD cards for different games, by changing them in and out dependant on what microSD card they are saved on.
There you have it! You’ve successfully installed or removed a memory card. If you’re still unsure how to insert or remove a microSD card from your Nintendo Switch, then drop us a comment below and the team at MyMemory would be happy to help.

Looking for a microSD card? Head to our website now to view the best memory cards for Nintendo Switch.


Comments